The Excel Checkbox form control
In this tutorial, I am going to show you how to create checkbox (also called tick box) in the Excel sheet. This is followed by a few examples of using it for different tables, so you can see checkboxes in action.
The checkboxes work like switches. If you On a switch to a machine, it should start working and in the Off state, it should stop.
Similarly, you may turn a checkbox “On and Off”; more accurately True/False. If the checkbox is in the True state by ticking, you may display a particular value in an associated cell. If that Excel checkbox is un-ticked state, some other value can be displayed in the same associated cell.
For example, display Pass as the checkbox is ticked and Fail as it is unchecked on a student result sheet.
In this tutorial, I am going to show you how to create checkbox (also called tick box) in the Excel sheet. This is followed by a few examples of using it for different Excel tables, so you can see checkboxes in action.
Steps for inserting checkbox into Excel sheet
Step 1:
The checkbox is a form control in Excel that you may place over a cell. For placing a checkbox in a sheet, go to the “Developer” tab.
If Developer tab is not visible, this is how you may configure it to display.
In Excel 2010 and above, go to File --> Options --> Customize Ribbon. There, you may see the “Developer” checkbox – Tick this and press OK.
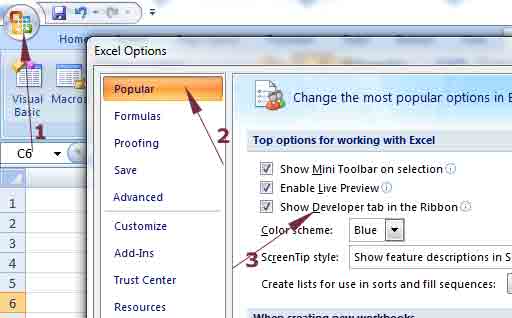
If you are using Excel 2007, then go to Microsoft Icon on the top left --> Excel Options --> Popular --> “Show Developers tab in the Ribbon”. Enable this option as shown below:
Step 2:
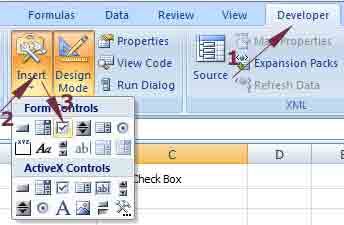
Under the Developer tab, press Insert and look for checkbox as shown below:
Step 3:
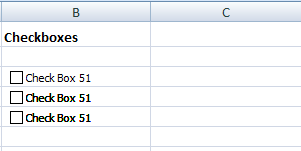
After clicking the checkbox under the form control, click in the area of excel sheet (in a cell) where a checkbox should be inserted. See the figure below:
Moving the checkbox
After a checkbox is placed in the Excel sheet, you may move it by selecting that checkbox. For selecting a checkbox, bring the mouse over the checkbox area (not the cell) and right click there. The checkbox should be selected.
For moving the checkbox, use the arrow keys on the keyboard OR as Move icon appears while you hover over the checkbox, use the mouse for moving checkbox anywhere.
Changing caption of the checkbox
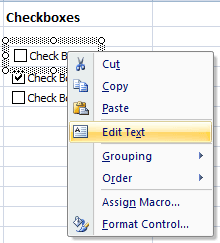
The default text is not something that you want in your Excel table. For modifying the caption/visible text of the checkbox, right click in the checkbox and press the Edit Text option as shown below:
Copying Checkboxes to other cells
If you have large Excel sheet with plenty of data and you require using checkboxes then creating a checkbox one by one can be a tedious task.
You may also copy the checkbox across a range of cells by simply using the mouse. For that, select the cell that contains a checkbox. Move the mouse pointer towards the right bottom of that cell until solid line + sign appears.
Now, drag the fill handle to the range of cells where you want to copy that checkbox. See the figure below:
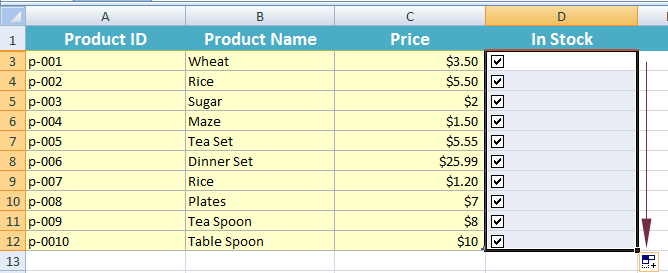
You can see, we displayed checkboxes for showing the status of a product whether it is “In stock” or not. The ticked state means the specific product is in stock. The unchecked state means out of stock.
Formatting the checkboxes
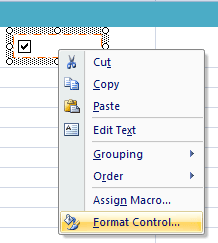
You may change the look of the checkbox by using “Format Control” option. To access that, select the checkbox by right-clicking on it and press “Format Control”:
The “Format Control” dialog should appear that enables you customizing the fill color, Line style (color, Style, Dashed, Arrows under the “Colors and Lines” tabs). Similarly, you may press the size tab for changing height, width, and scale of a checkbox.
You may play with other tabs for making a checkbox as per the need and liking.
Working with checkbox values
As mentioned earlier, the Excel checkboxes work in TRUE/FALSE states. If a checkbox is ticked, it is taken as TRUE while for the unchecked state it is FALSE.
The TRUE/FALSE values of the checkbox in ticked and un-ticked states can be visible if you link a cell to a checkbox. This can really be useful for making checkboxes more interactive. I will show one such example after this section, first have a look how TRUE/FALSE states can be reflected in cells.
See the following graphic:
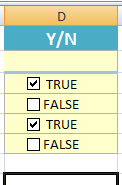
You can see, a few cells are displaying TRUE that are checked and others FALSE text that is unchecked.
This can be done easily by following these steps.
Right-click the checkbox for which you want to display TRUE/FALSE and select the “Format Control” option. Select the Control tab in Format Control dialog box. You can see the Cell link text box as shown by the red arrow below:
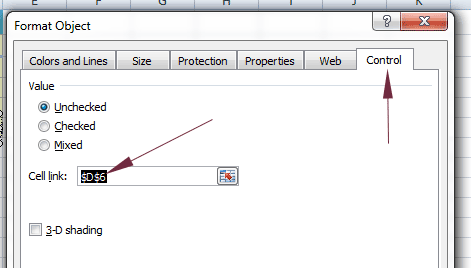
There, I used $D$6 cell. That means the ticked/un-ticked state values (TRUE/FALSE) will display in the same cell where I created the checkbox.
You may enter any other cell as per your requirement and press OK.
Now tick/untick the checkbox and see the updated value in the linked cell.
Using the TRUE/FALSE value for more practical example
This TRUE/VALUE in the cell can be very useful. For example, in our example table, we have a Status column that tells whether a product is In Stock or Out of Stock.
For the demo, I have created another column containing checkboxes. See the figure below:
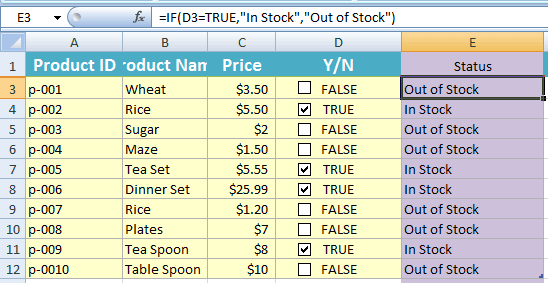
As a checkbox is ticked, the adjacent Status cell is updated by “In Stock” text. For the unchecked state, it displayed the “Out of Stock” value.
So how is it done? I simply checked the value of the respective cell that contained a checkbox and applied this formula to the Status column cells. For example, in E3 cell, the following formula is used:
=IF(D3=TRUE,"In Stock","Out of Stock")
In E4:
=IF(D4=TRUE,"In Stock","Out of Stock")
and so on.
By using IF function, we checked the value of checkbox and set the text to TRUE/FALSE values.
Creating an Excel checklist example
In this example of using checkboxes, I have created a rough checklist of website software development phases. The Column A cells list the tasks e.g. Planning, Analysis, Design etc.
Column B displays a checkbox for each task. If a checkbox is ticked, that means the task is completed. Otherwise, the task is incomplete or not yet started.
The column C is used to store TRUE/FALSE values for each respective checkbox. I have hidden this column as displaying it does not serve any purpose. We need its values that are still available.
Based on ticked and unchecked checkboxes, I have listed the total tasks completed and incomplete by using formula. Have a look at the table and formulas below:
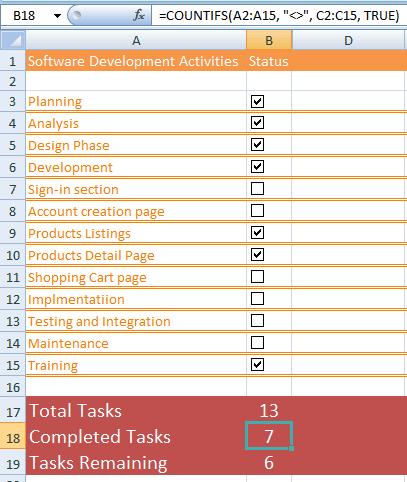
You can see, in the task checklist, 7 are ticked so Completed tasks are displayed as 7. The Tasks Remaining as 6 while the total number of tasks is 13.
The following formulas are used in B17, B18, and B19 for displaying the result based on Excel checklist:
D17 formula for Total tasks:
=COUNTA(A3:A15)
D18 Formula for completed tasks:
=COUNTIF( C2:C15, TRUE)
D19 formula for remaining tasks:
=COUNTIF( C2:C15, FALSE)
You may notice we used C2:C15 ranges while this is not visible in the above image. As you tick/untick the checkbox, the result will be updated automatically for complete/remaining tasks. You may download the Excel checklist template here.
How to delete checkboxes
For deleting checkbox one by one, you may right-click on a checkbox and press delete. However, if you want to remove more than one checkboxes at single operation – follow these steps.
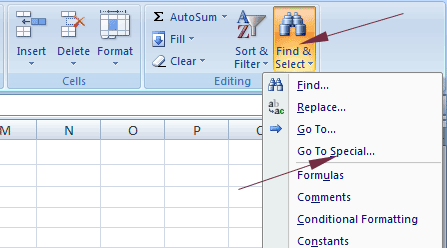
Under the Home tab look for “Find & Select”. As you press it, click on “Go to Special”.
The “Go to Special” dialog should appear where select the “Objects” and press OK.
It should select all checkboxes and any other objects in the Excel sheet. Press the delete button in keyboard and you are done.
For removing selected checkboxes, you may also do this:
Again press the “Find & Select” and press “Selection Pane” option located at the bottom. You can see a list of all objects including checkboxes. Select the checkboxes you want to remove and press the Delete button.