How to Read Excel File by read.xlsx in R language
In this tutorial, you will how to use R xlsx library to read Excel files (.xlsx)’ sheets completely, and partially (a few rows, columns etc.) The R language xlsx package has a method that has read.xlsx function that is used to read Excel Workbooks.
Reading Excel Files in R Language
In this tutorial, you will how to use R xlsx library to read Excel files (.xlsx)’ sheets completely, and partially (a few rows, columns etc.)
The R language xlsx package has a read.xlsx function that is used to read Excel Workbooks.
Following example shows how to use this function to fetch one or more rows.
An example of fetching complete sheet using read.xlsx function
Follow these steps to fetch the complete specified sheet in R language.
Step 1:
If you have not already installed, execute this command in the R console to install the required xlsx library:
install.packages("xlsx")
Just to remind you, it requires JDK 1.5 or above. Read more about the requirements here.
Step 2:
Read the Excel sheet in the Workbook by specifying its path as follows:
fetch_data <- read.xlsx("Exce-R-test.xlsx", sheetIndex = 1)
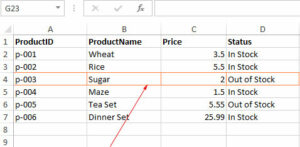
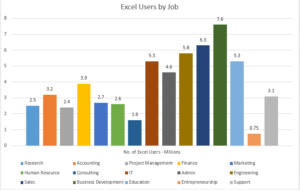
There, we assumed the file resides at the same location where R workspace is located. See our sample sheet data below.
sheetIndex specifies the number of sheet in the Workbook to fetch data from.
Step 3:
Display the data by using this statement:
print(fetch_data)
That’s it!
Combine all the above and see the sample data and output of the above code
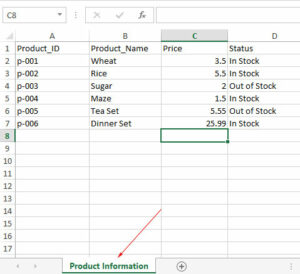
Following is the sample Excel sheet with the data we are using for our examples:
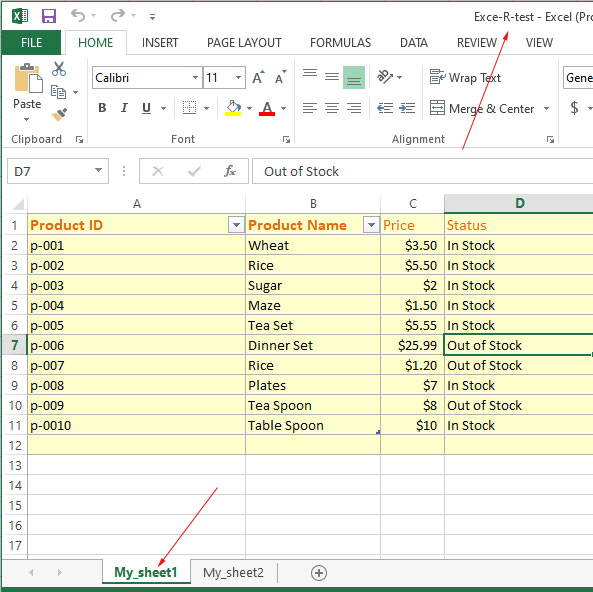
- Workbook Name = Exce-R-test.xlsx
- Sheet Name = My_sheet1
The R Lang code to get complete sheet data:
# Loading the library

library("xlsx")

# Reading sheet = 1

fetch_data <- read.xlsx("Excel-R-test.xlsx", sheetIndex = 1)

#Display the data

print(fetch_data)
The output in the R console:
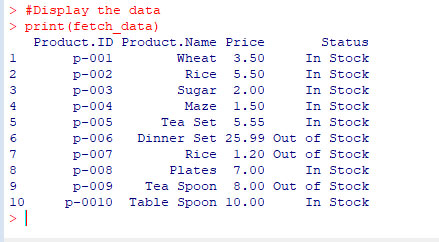
You can see, the above program returned all rows from the specified sheet.
Note: You may also specify a path like this (if the file is not at the same location as R Workspace): e.g.
fetch_data <- read.xlsx("C:\\Users\\test\\Excel-R-test.xlsx", sheetIndex = 1)
Fetching a few rows example
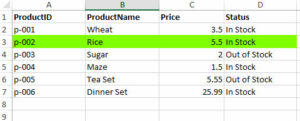
By specifying the rowIndex argument, you may specify which rows to fetch from the sheet. In the example below, we will get 2nd to 7th row from our sample sheet.
See the code and output in the R console below:
R code:
# Loading the library

library("xlsx")

# Reading sheet = 1 and getting only row 3 to 7

fetch_data <- read.xlsx("Exce-R-test.xlsx", sheetIndex = 1, rowIndex = 3:7)

#Display the data

print(fetch_data)
Result in R console:

Fetching specified columns example
Similarly, you may specify which columns to get data from the Excel sheet. For that, you may use the colIndex argument and there you may specify the minimum and maximum index of the columns.
In the example below, we will only get data of 2nd and 3rd columns from our sample sheet:
R code:
# Loading the Excel library
library("xlsx")
# Reading sheet = 1 and getting only 2nd and 3rd columns
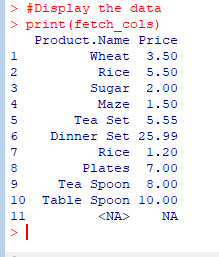
fetch_cols <- read.xlsx("Exce-R-test.xlsx", sheetIndex = 1, colIndex = 2:3)
#Display the data
print(fetch_cols)
Output as we executed this code:
Specifying both rows and cols example
You may limit both rows and columns as well by using the above two examples parameters:
# Loading the Excel library
library("xlsx")
# Reading sheet = 1 and limiting rows and cols
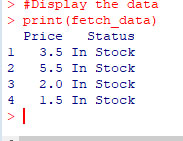
fetch_data <- read.xlsx("Exce-R-test.xlsx", sheetIndex = 1, rowIndex = 1:5, colIndex = 3:4)
#Display the data
print(fetch_data)
Result:
Specifying sheet name rather than index
You may also specify the sheet name rather than its index as using the xlsx package. For example, our sample sheet name is My_sheet1 which index is 1. We may use:
sheetName="My_sheet1"
So, this will produce the same result as in one of the above examples:
# Loading the library

library("xlsx")

# Reading sheet = 1 and getting only row 3 to 7

fetch_data1 <- read.xlsx("Exce-R-test.xlsx", sheetName="My_sheet1", rowIndex = 1:7)

#Display the data

print(fetch_data1)