How to Add Data in Excel by R write.xlsx Function
In this tutorial, we will explain how to write new data in Excel sheets by using xlsx package.
Writing in Excel Sheets by write.xlsx
In this tutorial, we will explain how to write new data in Excel sheets by using xlsx package.
For the information, the xlsx is R package which is a Java-based solution for performing read, write, and formatting of Excel sheets.
The xlsx has various functions to perform different tasks in Excel and write.xlsx is one of those, which is the topic of this tutorial.
Syntax of write.xlsx function
Following is the syntax:
write.xlsx(x, file, sheet = "Sheet1", ...)
An example of writing data in a new Workbook
In the first example, we will insert one row of data into a new Excel sheet. Our sample sheet is “Product Information” and it contains four columns and we will provide one row of data to write in that sheet as follows:
# Loading the library

library("xlsx")

#create data frame that will be rows for Excel Sheet

prod_rows <- data.frame(ProductID=c('p-001'),

                 ProductName=c('Wheat'),

                 Price=c(3.50),

                 Status=c('In Stock'))

#view data frame

prod_rows

#Writing row to Excel including header

write.xlsx(prod_rows, 'Products.xlsx')
Output in Excel Sheet:
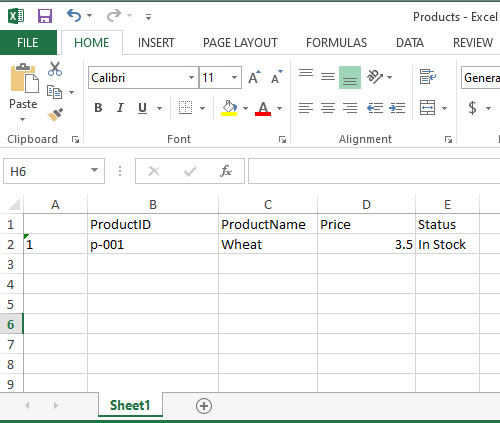
You may notice two rows: one is the header row and the other is the data we provided in R code.
Also notice, the name of the sheet is “Sheet1” that we will change to “Product Information” in the example below.
If you look at the sheet, there is another column A with a row number, though we did not provide it in our dataset.
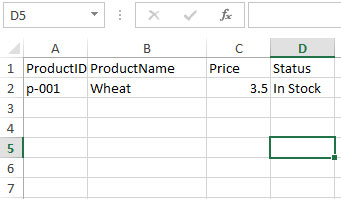
You can remove this by adding:
row.names=FALSE
So, write.xlsx line becomes:
write.xlsx(prod_rows, 'Products.xlsx', row.names=FALSE)
and the output will be:
Note: If your specified Workbook does not exist, it will be created.
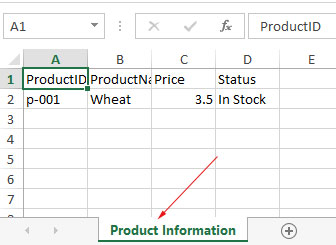
Giving custom sheet name example
The sheet name can be specified by using sheetName argument to the write.xlsx function.
See an example below where we set the sheet name s “Product Information”:
# Loading the library

library("xlsx")

#create data frame that will be rows for Excel Sheet

prod_rows <- data.frame(ProductID=c('p-001'),

                 ProductName=c('Wheat'),

                 Price=c(3.50),

                 Status=c('In Stock'))


#Writing row to Excel including header with custom sheet name

write.xlsx(prod_rows, 'Products.xlsx',sheetName = 'Product Information', row.names=FALSE)
Result:
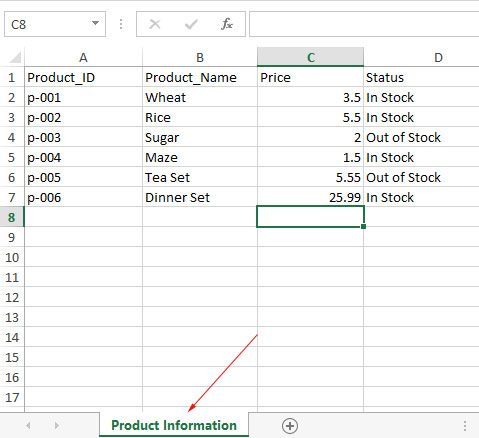
Writing multiple rows in an existing sheet
Similarly, you may write multiple rows of data by using write.xlsx function. The following example inserts seven rows including the header row:
R Lang code:
# Loading the library
library("xlsx")
#create data frame that will be rows for Excel Sheet
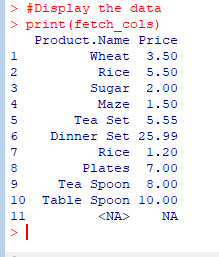
prod_rows <- data.frame(Product_ID=c('p-001','p-002','p-003','p-004','p-005','p-006'),
Product_Name=c('Wheat','Rice','Sugar','Maze','Tea Set','Dinner Set'),
Price=c(3.50,5.50,2.00,1.50,5.55,25.99),
Status=c('In Stock','In Stock','Out of Stock','In Stock','Out of Stock','In Stock'))
#view data frame
prod_rows
#Writing row to Excel including header
write.xlsx(prod_rows, 'Products.xlsx',sheetName = 'Product Information', row.names=FALSE)
Resultant sheet: