Insert Image in Excel sheet by openpyxl
By using openpyxl.drawing.image module, you may insert images to the Excel sheet using Python programs.
How to insert an image in an Excel sheet by openpyxl library
By using openpyxl.drawing.image module, you may insert images to the Excel sheet using Python programs.
The image path is specified in the image attribute and add_image attribute of the sheet object is used to add an image to the specified cell.
See the examples below for better understanding.
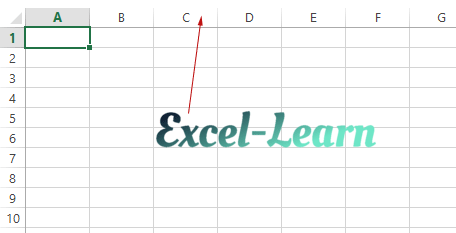
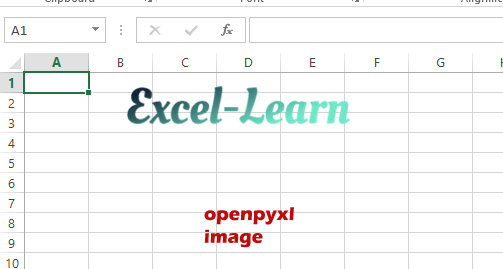
An example to insert image in C5 cell
We will insert a logo file in .png format into a sheet.
Python program:
import openpyxl

from openpyxl import Workbook

from openpyxl.drawing.image import Image

#Create a workbook object

wb_image = Workbook()


#Active sheet

ws_image = wb_image.active

#Specify image to be placed in the active sheet

img = openpyxl.drawing.image.Image('logo.png')

#Using add_image sheet attribute

ws_image.add_image(img, 'C5')


#Create a new Workbook and save the image

wb_image.save("wb_image_ex.xlsx")
Result:
As you execute this program, it may produce the following error:
“ImportError: You must install Pillow to fetch image objects”
You may install the Pillow by using this command:
pip install pillow
How did it work?
- We included the openpyxl library
- We also imported the Image from openpyxl.drawing.image
- A workbook object is created and an active sheet is specified.
- Then we assigned the image path (located in the same directory where the Python code file is located).
- This is followed by using the add_image attribute of the sheet object where we specified the image and cell (C5).
- Saved the workbook.
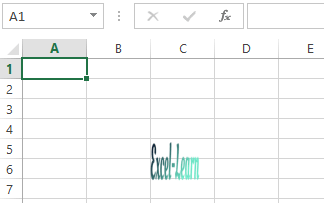
Setting the height and width of image
You may also set the image size by using the height and width of the image.
See the example where we used the same image as above except its size is changed:
import openpyxl

from openpyxl import Workbook

from openpyxl.drawing.image import Image

#Create a workbook object

wb_image = Workbook()


#Active sheet

ws_image = wb_image.active

#Specify image to be placed in the active sheet

img = openpyxl.drawing.image.Image('logo.png')

#Setting image height and width

img.height = 50

img.width = 50

#Using add_image sheet attribute

ws_image.add_image(img, 'C5')

#Create a new Workbook and save the image

wb_image.save("wb_image_ex.xlsx")
Output:
Placing image based on x and y coordinates
Rather than placing the image in a cell, you may place an image based on horizontal and vertical positions.
In the example below, we will place the image by specifying:
- Horizontal distance (x) = 100
- Vertical distance (y) = 10
You can change the number as per need.
The code:
import openpyxl

from openpyxl import Workbook

from openpyxl.drawing.image import Image

from openpyxl.drawing.spreadsheet_drawing import AbsoluteAnchor

from openpyxl.drawing.xdr import XDRPoint2D, XDRPositiveSize2D

from openpyxl.utils.units import pixels_to_EMU, cm_to_EMU


#Create a workbook object

wb_image = Workbook()

#Active sheet

ws_image = wb_image.active

#Specify image to be placed in the active sheet

img = openpyxl.drawing.image.Image('logo.png')

p2e = pixels_to_EMU

#Specify image hight and width

img.height = 50

img.width = 230


#Define x and y position in the sheet

position = XDRPoint2D(p2e(100), p2e(10))


size = XDRPositiveSize2D(p2e(img.width), p2e(img.height))

img.anchor = AbsoluteAnchor(pos=position, ext=size)

#Add image without specifying cell

ws_image.add_image(img)

wb_image.save('wb_image_ex.xlsx')
Output:
This solution is courtesy of an answer in Stack Overflow.